OpenWRT on GL-AR750 + E3372 in NCM + receive SMS (2023)

Written by pmd - - no comments

⚫ Installed last available OpenWRT on AR750

login as: root
root@192.168.3.1's password:


BusyBox v1.35.0 (2023-04-27 20:28:15 UTC) built-in shell (ash)

  _______                     ________        __
 |       |.-----.-----.-----.|  |  |  |.----.|  |_
 |   -   ||  _  |  -__|     ||  |  |  ||   _||   _|
 |_______||   __|_____|__|__||________||__|  |____|
          |__| W I R E L E S S   F R E E D O M
 -----------------------------------------------------
 OpenWrt 22.03.5, r20134-5f15225c1e
 -----------------------------------------------------
root@OpenWrt:~#

Source: [OpenWrt Wiki] GL.iNet GL-AR750

⚫ Expected configuration

One OpenWRT router getting internet access through a 4G USB dongle using NCM connection (much faster than PPP).

⚫ Configuration

⚪ Installing necessary packets on OpenWRT

# opkg update
# opkg installkmod-usb2 kmod-usb3 kmod-usb-net-huawei-cdc-ncm comgt-ncm kmod-usb-serial kmod-usb-serial-option kmod-usb-serial-wwan luci-proto-ncm usb-modeswitch kmod-usb-serial-ipw
# opkg install nano curl socat

Sources:

  1. Installer le firmware OpenWrt sur un routeur Wi-Fi
  2. Huawei E3272 и OpenWRT: klink0v — LiveJournal

⚪ Preparing the 4G USB dongle (Huawei E3272)

I bought for cheap money an old second-hand Huawei E3272. It was loaded with a HiLink software (22.X) and SIM locked.

It took me a day of struggle to sim unlock it and finally install a working stick software (21.X).

Sources:

Finally I installed a HiLink software + WEBUI to validate good working of the 4D USB dongle on Windows 10 then installed a stick software.
All downloaded from 3ginfo.ru :

  • Huawei_E3272_Firmware_22.436.07.00.00_Universal_3Ginfo.ru.7z
  • Huawei_E3272s_WebUI_17.100.08.00.03_general_3Ginfo.ru.7z
  • Huawei_E3272s-153_Firmware_21.436.11.00.00_Universal_3Ginfo.ru.7z

All of this had to be done on a Windows 7 computer. Impossible to do on a Windows 10 computer.

⚫ Testing

⚪ Checking Huawei E3272 on OpenWRT

root@OpenWrt:~# socat - /dev/cdc-wdm0,crnl

AT

OK
AT^SYSINFOEX

^SYSINFOEX:2,3,0,1,,6,"LTE",101,"LTE"

OK
AT^SYSCFGEX=?

^SYSCFGEX: ("00","01","02","03","99"),((2000000400380,"GSM900/GSM1800/WCDMA900/WCDMA2100"),(4280000,"GSM850/GSM1900/WCDMA850"),(3fffffff,"All bands")),(0-2),(0-4),((c5,"LTE_B1/LTE_B3/LTE_B7/LTE_B8"),(7fffffffffffffff,"All bands"))

OK
ATI

Manufacturer: huawei
Model: E3272
Revision: 21.436.11.00.00
IMEI: XXXXXXXXXXXXXXX
+GCAP: +CGSM,+DS,+ES

OK
AT^FHVER

^FHVER:"E3272S-600 21.436.11.00.00,CH1E3272SM Ver.A"

OK
AT^VERSION?

^VERSION:BDT:Aug 30 2013, 12:47:28
^VERSION:EXTS:21.436.11.00.00
^VERSION:INTS:
^VERSION:EXTD:WEBUI_17.100.08.00.03_Hilink_V7R1_V3R2_V3R3
^VERSION:INTD:
^VERSION:EXTH:CH1E3272SM Ver.A
^VERSION:INTH:
^VERSION:EXTU:E3272
^VERSION:INTU:
^VERSION:CFG:1004
^VERSION:PRL:

OK
AT^SETPORT=?

^SETPORT:1: 3G MODEM
^SETPORT:2: 3G PCUI
^SETPORT:3: 3G DIAG
^SETPORT:5: 3G GPS
^SETPORT:A: BLUE TOOTH
^SETPORT:16: NCM
^SETPORT:A1: CDROM
^SETPORT:A2: SD
^SETPORT:10: 4G MODEM
^SETPORT:12: 4G PCUI
^SETPORT:13: 4G DIAG
^SETPORT:14: 4G GPS

OK
AT^SETPORT?

^SETPORT:A1,A2;10,12,16,A1,A2

OK


^Croot@OpenWrt:~#
root@OpenWrt:~#
root@OpenWrt:~#

⚪ Speed test

I made a speed test with PPP and NCM protocol to verify the common speech readable on internet:

PPP (wikipedia) NCM (wikipedia)

NCM is definitly better performing.

⚪ USSD and SMS and Telegram

To be checked and tried:

Telegram

Send a message to telegram chat:

curl -X POST -H "Content-Type:multipart/form-data" -F chat_id=<CHAT_ID> -F text="message to test !!!" "https://api.telegram.org/bot<token_from_@BotFather>/sendMessage"
curl -s -X POST -H "Content-Type:multipart/form-data" -F chat_id=<CHAT_ID> -F text="message to test !!!" "https://api.telegram.org/bot<token_from_@BotFather>/sendMessage" | jq '.ok'

Get updates from telegram chats:

curl -s https://api.telegram.org/bot<token_from_@BotFather>/getUpdates | jq
curl -s https://api.telegram.org/bot<token_from_@BotFather>/getUpdates | jq '.result[].message.text'
curl -s https://api.telegram.org/bot<token_from_@BotFather>/getUpdates | jq '.result[].message.date'

Send a message+file to telegram chat:

curl -s -X POST https://api.telegram.org/bot<token_from_@BotFather>/sendDocument -F chat_id=<CHAT_ID> -F document=@'/path/to/document' -F caption='your message here'

Receive SMS with smstools3 and forward to Telegram

opkg install kmod-usb-serial kmod-usb-serial-wwan kmod-usb-serial-option usb-modeswitch smstools3 curl iconv jq bc
mkdir /usr/local
mkdir /usr/local/bin
nano /usr/local/bin/pushsms

This file will be called as soon as a new SMS is received in order to transfer it to a Telegram chat:

#!/bin/sh
# /usr/local/bin/pushsms
# chmod +x /usr/local/bin/pushsms

chat_id=<CHAT_ID>
token=<token_from_@BotFather>

if [ "$1" == "RECEIVED" ] || [ "$1" == "REPORT" ]; then
   from=`grep "From:" $2 | awk -F ': ' '{printf $2}'`
   #sent=`grep "Sent:" $2 | awk -F ': ' '{printf $2}'`
   #received=`grep "Received:" $2 | awk -F ': ' '{printf $2}'`
   alphabet=`grep "Alphabet:" $2 | awk -F ': ' '{printf $2}'`

   if [ "$alphabet" = "UCS2" ]; then
       content=$(sed -e '1,/^$/ d' < "$2" | iconv -f UNICODEBIG -t UTF-8)
   else
       content=$(sed -e '1,/^$/ d' < "$2" | iconv -f "windows-1252" -t UTF-8)
   fi

   text=$(cat << EOF
$content
From $from
EOF
)

   curl -s -d "chat_id=$chat_id&text=$text&disable_web_page_preview=true" -X POST https://api.telegram.org/bot"$token"/sendMessage

fi

Don't forget to make above file executable.

Now editing the configuration of smstools3:

# /etc/smsd.conf
#
# Description: Main configuration file for the smsd
#

devices = GSM1
incoming = /var/spool/sms/incoming
outgoing = /var/spool/sms/outgoing
checked = /var/spool/sms/checked
failed = /var/spool/sms/failed
sent = /var/spool/sms/sent
receive_before_send = no
autosplit = 3
logfile = 1
loglevel = 5
eventhandler = /usr/local/bin/pushsms

# Uncomment (and edit) this section to allow smsd to start:
#
[GSM1]
init = AT+CPMS="ME","ME","ME"
device = /dev/cdc-wdm0
incoming = yes
#pin = 0000
baudrate = 9600
signal_quality_ber_ignore = yes
detect_unexpected_input = no
memory_start = 0
cs_convert_optical = no
report = yes

Now restart the utility:

/etc/init.d/smstools3 restart

And check logs:

logread | grep smsd

Send SMS with smstools3

sendsms 491721234567 'Hello, how are you'

Some method to send USSD code from command line

root@OpenWrt:~# socat - /dev/cdc-wdm0,crnl
AT+CUSD=1,"AA18CC3602",15

OK

^MODE: 5,4

^RSSI: 26

+CUSD: 0,"041204300448002004370430043F0440043E044100200432002004340435043B04350020003A002900200421043A043E0440043E0020043F04400438043B043504420438044200200053004D00530020043E00200432044B043F043E043B043D0435043D043804380021",72

OK
^Croot@OpenWrt:~#

Open kinda serial communication link with modem:

root@OpenWrt:~# socat - /dev/cdc-wdm0 << EOF
> AT+CUSD=1,"AA18CC3602",15
> EOF


OK

root@OpenWrt:~#
root@OpenWrt:~# cat /dev/cdc-wdm0 | grep +CUSD: > ./USSDresult.txt &
root@OpenWrt:~# echo -e -n "AT+CUSD=1,\"AA18CC3602\",15\r\n" > /dev/cdc-wdm0
root@OpenWrt:~# killall cat
[1]+ Done cat /dev/cdc-wdm0 | grep +CUSD: 1>./USSDresult.txt
root@OpenWrt:~# cat ./USSDresult.txt
+CUSD: 0,"041204300448002004370430043F0440043E044100200432002004340435043B04350020003A002900200421043A043E0440043E0020043F04400438043B043504420438044200200053004D00530020043E00200432044B043F043E043B043D0435043D043804380021",72
root@OpenWrt:~# cat ./USSDresult.txt | sed -e 's@+CUSD: 0,"@@g;s@",15@@g;s@",72@@g'
041204300448002004370430043F0440043E044100200432002004340435043B04350020003A002900200421043A043E0440043E0020043F04400438043B043504420438044200200053004D00530020043E00200432044B043F043E043B043D0435043D043804380021
root@OpenWrt:~# rm ./USSDresult.txt
root@OpenWrt:~#

To code the USSD code and decode the answer you can use this tool: SMSTools3 PDU Converter. Or these two first shell script functions below. Third function to code USSD, catch the answer and decode it:

#!/bin/sh
# Idea: https://github.com/Shumaher/huawei-ussd/blob/master/ussd.sh
# But slightly modified to make it work

decodeUCS2() # UCS2 to text (to decode USSD answer)
{
   bytes=$(echo -n $1 | sed "s/\(.\{2\}\)/\\\x\1/g")
   REPLY=$(printf $bytes | iconv -f UNICODEBIG -t UTF-8)
   echo -n "$REPLY"
}

encodePDU() # text to PDU (to code the USSD)
{
   in=$1
   let "in_len=${#in}-1"
   for chr in $(seq  0 $in_len)
   do
       let "chr2=$chr+1"
       let "t=$chr%8+1"
       if [ "$t" -ne 8 ]; then
           byte=$(printf "%d" "'${in:$chr:1}")
           let "c=$byte>>($chr%8)"
           let "c2=(1<<$t)-1"
           byte2=$(printf "%d" "'${in:$chr2:1}")
           let "b=$byte2 & $c2"
           let "c=$b<<(8-$t) | $c"
           REPLY=$REPLY$(echo "obase=16; $c" | bc | sed 's/\<[0-9A-F]\>/0&/' )
       fi
   done
       # echo "AT-command to send '$1' as USSD-request: 'AT+CUSD=1,\"$REPLY\",15"
       echo -n "$REPLY"
}

sendUSSD() # To send an USSD code to operator and get result
{
   ussd_human=$1
   ussd_pdu=$(encodePDU $ussd_human)

   rm -f ./USSDresult.txt
   cat /dev/cdc-wdm0 | grep "+CUSD: 0," > ./USSDresult.txt &
   echo -e -n "AT+CUSD=1,\"$ussd_pdu\",15\r\n" > /dev/cdc-wdm0
   # wait up to 10 seconds for the answer
   sleeptime=10
   while [ $(cat ./USSDresult.txt | grep -c "+CUSD: 0,") -le 0 ] && [ $sleeptime -ge 1 ]
   do
       sleep 1
       sleeptime=$(($sleeptime - 1))
   done
   killall cat
   # here could add an 'if' statement in case 10sec waited and answer still not catched
   REPLY=$(cat ./USSDresult.txt | sed -e 's@+CUSD: 0,"@@g;s@",15@@g;s@",72@@g' | tr -d '\r\n')
   REPLY=$(decodeUCS2 "$REPLY")
   echo -n "$REPLY"
   rm ./USSDresult.txt
}

=> sendUSSDcatchANSWER.sh

Various sources:

OpenWRT on GL-AR150 + Guest Wifi over OpenVPN (2023)

Written by pmd - - no comments

⚫ Installed last available OpenWRT on AR150

login as: xxxx
root@192.168.1.1's password:

BusyBox v1.35.0 (2023-04-27 20:28:15 UTC) built-in shell (ash)

  _______                     ________        __
 |       |.-----.-----.-----.|  |  |  |.----.|  |_
 |   -   ||  _  |  -__|     ||  |  |  ||   _||   _|
 |_______||   __|_____|__|__||________||__|  |____|
          |__| W I R E L E S S   F R E E D O M
 -----------------------------------------------------
 OpenWrt 22.03.5, r20134-5f15225c1e
 -----------------------------------------------------
#

Source: [OpenWrt Wiki] GL.iNet GL-AR150

⚫ Expected configuration

The router will get access to internet by connecting to a Wifi network available around using wlan0 interface.
The router will spread two independant Wifi network :

  1. First Wifi will connect users on br-lan interface
    br-lan users will have access to internet through wlan0
  2. Second Wifi will connect users on br-lan2 interface
    br-lan2 users will have access to internet exclusively through tun0 interface (VPN)

⚫ Configuring Guest Wifi

Source: Guest Wi-Fi using LuCI (I didn't need to touch anything in Network > Firewall > Traffic Rules)

⚫ Installing OpenVPN and set first configuration

⚪ Installing OpenVPN

# opkg update
# opkg install openvpn-openssl ip-full luci-app-openvpn

Source: OpenWrt setup with NordVPN | NordVPN support

⚪ Configuring NordVPN

Download a NordVPN configuration : Server recommended by NordVPN | NordVPN


Go to VPN > OpenVPN

Under the “OVPN configuration file upload” section name the VPN connection in the “Instance name” field (I named it “nordvpn”.) After that, click on the Browse button, locate the downloaded server file and click Upload.

In the “OpenVPN instances” section, click the Edit button next to the instance you have just created.


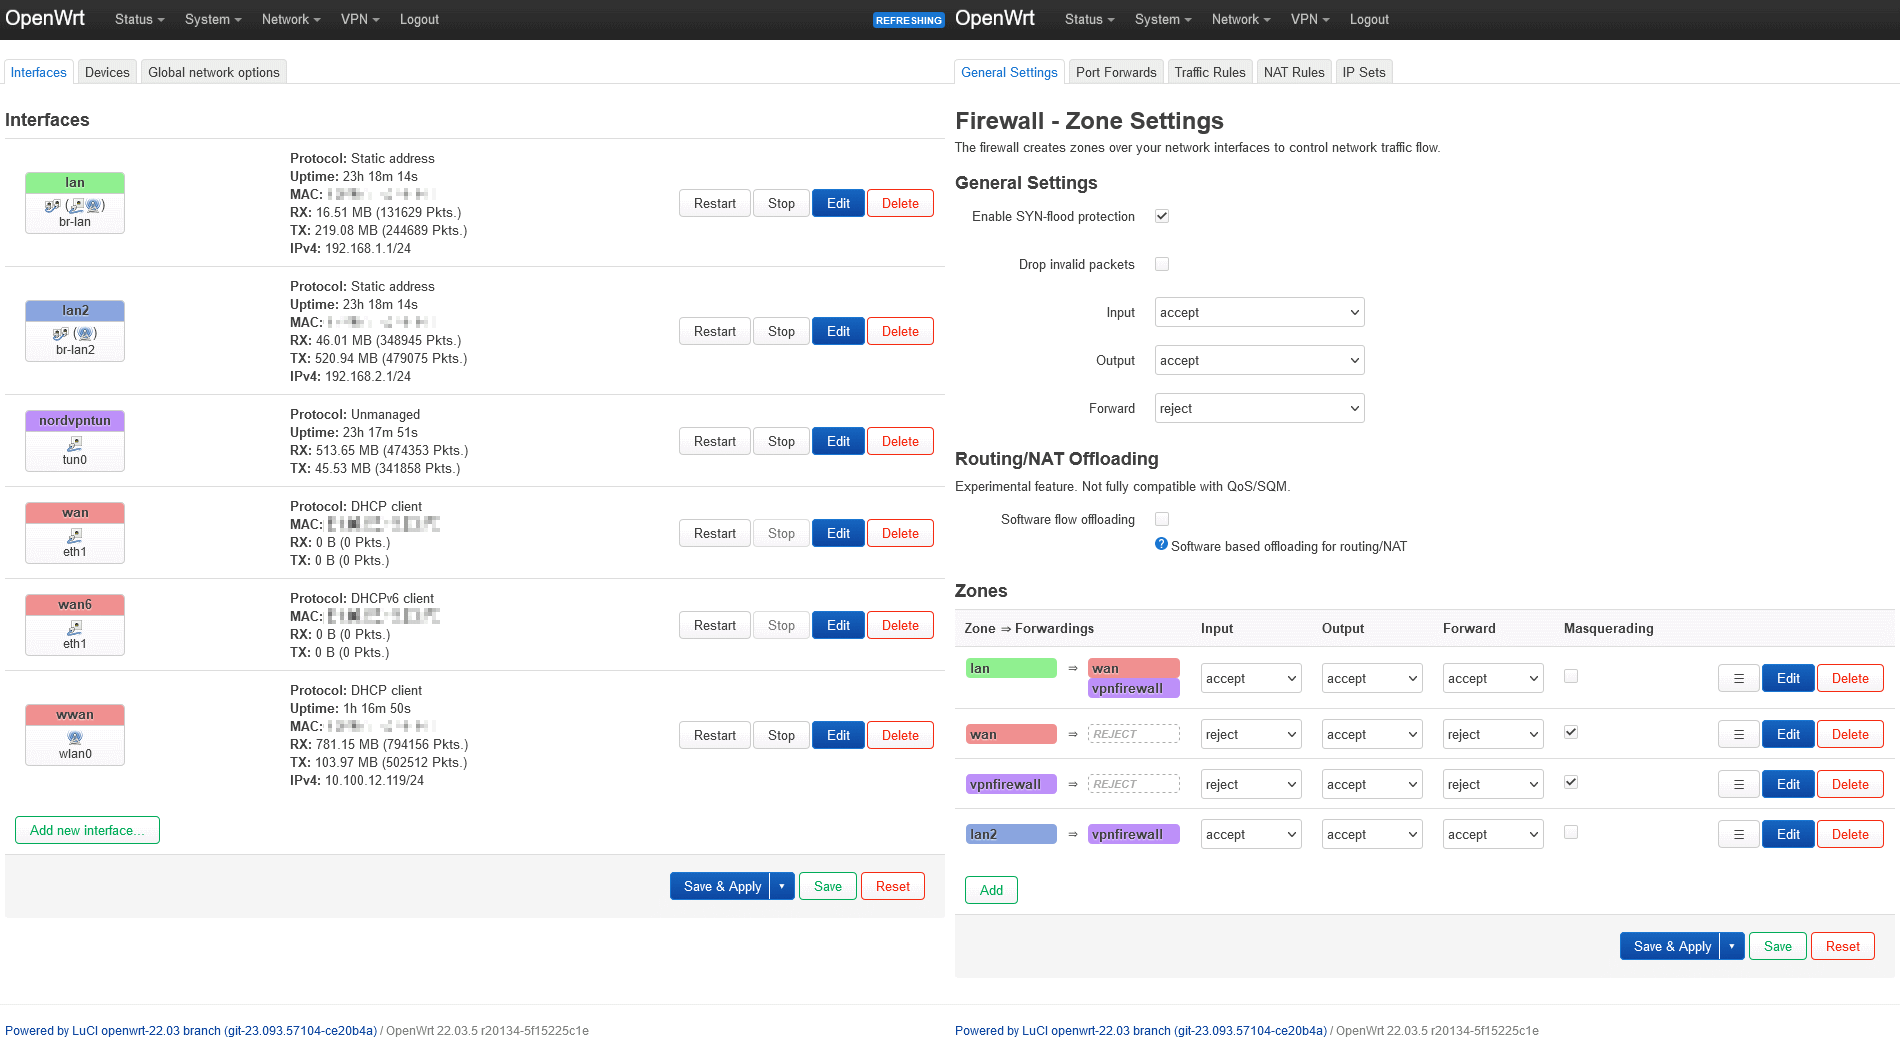
Illustration #01 about previous steps


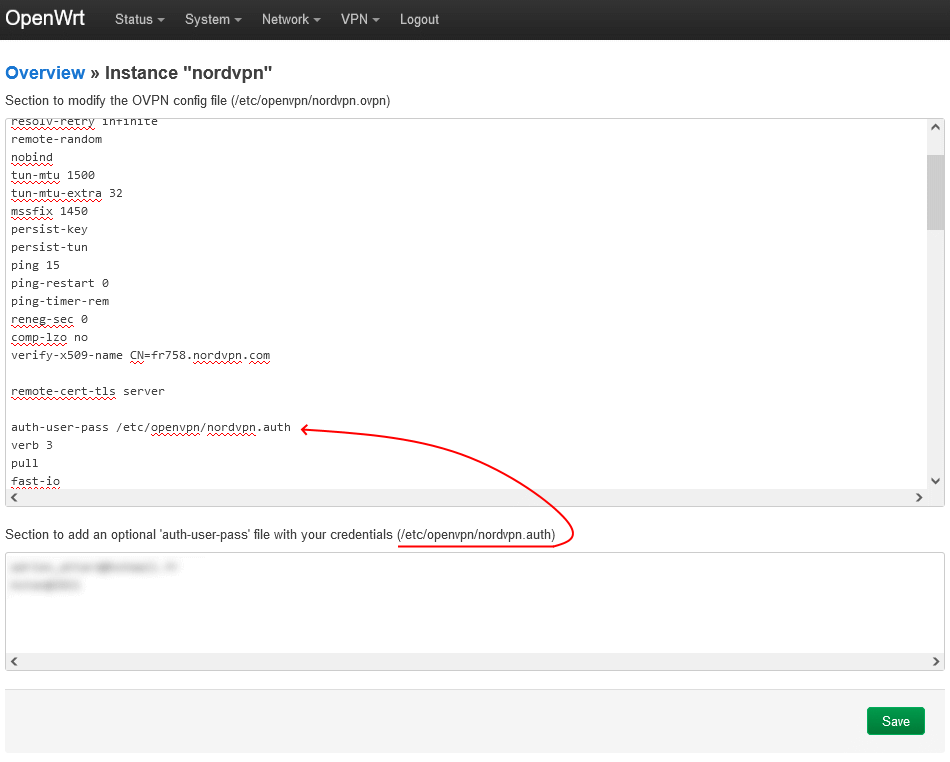
In the lower field, enter your NordVPN service credential username and password into separate lines.

username
password

Now, copy the path to the credentials file that is given right above the field containing the credentials and paste it next to the “auth-user-pass” line in the “Config file” section above. It should look like this: auth-user-pass /etc/openvpn/nordvpn.auth

Click on the Save button at the bottom.


Illustration #02 about previous steps


Go to Network > Interfaces

Select the Add new interface… button and name it “nordvpntun”.
Click on the “Protocol” dropdown menu and choose “Unmanaged”.
In the “Interface” dropdown, enter the name “tun0” at the bottom -- custom -- field and press the Enter key.
Click the “Create interface” and Save buttons.


Go to Network > Firewall

Click the “Add” button and adjust it as follows:

  1. Name it “vpnfirewall”;
  2. Set the “Input” option as “Reject”;
  3. Leave “Output” as “Accept” and “Forward” as “Reject”;
  4. Check the “Masquerading” option;
  5. Check the “MSS clamping” option;
  6. From the “Covered Networks” dropdown menu choose “nordvpntun”;
  7. In the “Allow forward from source zones” dropdown menu, choose “lan”;
  8. Click the “Save” button.

In the “Zones” section, find the zone named “lan”, and click on the “Edit” button.

In the “Allow forward to destination zones” dropdown check the “nordvpntun” entry.


Go to Network > DHCP and DNS

In the “General Settings” tab, find the “DNS forwardings” option and enter DNS addresses there. Addresses could be:

  • NordVPN DNS : 103.86.96.100 and 103.86.99.100 | Source 1
  • OpenDNS : 208.67.222.222 and 208.67.220.220 | Source 1, 2
  • Google DNS : 8.8.8.8 and 8.8.4.4 | Source 1

Go to the “Resolv and Hosts Files” tab, check the “Ignore resolve file” checkbox, and click the “Save & Apply” button.

You can verify which DNS server you are actually requested data to by using ths website : DNS leak test


Go to VPN > OpenVPN

In the “OpenVPN instances” section, check the “Enable” option next to the NordVPN option in the list, and click the “Save & Apply” button.

See Illustration #01 for final setup.

Now all you internet paquets should go through the VPN link.

⚪ Creating route-up.sh to chose which paquets should go through VPN

In your OpenVPN configuration file, you need to add these both lines:

  • route-noexec
    => so OpenVPN will not modify main routing table itself
  • route-up /etc/openvpn/route-up.sh
    => so OpenVPN will execute this file where we will add some rules and routes for vpn routing table
#!/bin/sh
# /etc/openvpn/route-up.sh
# chmod +x /etc/openvpn/route-up.sh

# https://openvpn.net/community-resources/reference-manual-for-openvpn-2-4/#scripting-and-environmental-variables
# This website to know what environmental-variables are available.

# Inspiration :
# https://github.com/soehest/openvpn/blob/master/route-up.sh
# https://medium.com/@ingamedeo/openvpn-splittunneling-on-openwrt-e4302a1a4e12

echo "$dev : $ifconfig_local -> $ifconfig_remote gw: $route_vpn_gateway" | logger

# Checks to see if there is an IP routing table named 'vpn', create if missing
if [ $(cat /etc/iproute2/rt_tables | grep vpn | wc -l) -eq 0 ]; then
    echo "100     vpn" >> /etc/iproute2/rt_tables
    echo "IP routing table named 'vpn' created" | logger
fi

# Remove any previous rules in the 'vpn' routing table
#/sbin/ip rule | sed -n 's/.*\(from[ \t]*[0-9\.]*\).*vpn/\1/p' | while read RULE
/sbin/ip rule | grep vpn | sed -n 's@.*\(from[ \t]*[0-9\./]*\)@\1@p' | while read RULE
do
    echo "remove old rule:   /sbin/ip rule del ${RULE}" | logger
    /sbin/ip rule del ${RULE}
done
# Remove any previous routes in the 'vpn' routing table
echo "remove old routes: /sbin/ip route flush table vpn" | logger
/sbin/ip route flush table vpn

# Search route for traffic coming from 192.168.2.0/24 in table 'vpn'
# (unicast: This rule type simple causes the kernel to refer to the
# specified routing table in the search for a route.)
echo "adding rule:       /sbin/ip rule add from 192.168.2.0/24 table vpn" | logger
/sbin/ip rule add from 192.168.2.0/24 table vpn

# Search route for traffic going to 192.168.2.0/24 in table 'vpn'
echo "adding rule:       /sbin/ip rule add to 192.168.2.0/24 table vpn" | logger
/sbin/ip rule add to 192.168.2.0/24 table vpn

# Use 'vpn' table as default for tun0
echo "adding route:      /sbin/ip route add table vpn default dev ${dev}" | logger
/sbin/ip route add table vpn default dev ${dev}

# Route traffic from/to 192.168.2.0/24 on br-lan2 using the 'vpn'.
# table. (192.168.2.1 is the source address for outgoing packets)
echo "adding route:      /sbin/ip route add 192.168.2.0/24 dev br-lan2 proto kernel scope link src 192.168.2.1 table vpn" | logger
/sbin/ip route add 192.168.2.0/24 dev br-lan2 proto kernel scope link src 192.168.2.1 table vpn

# Logging default rules
echo "/sbin/ip rule -----------" | logger
/sbin/ip rule  | logger

# Logging default route table
echo "/sbin/ip route show -----------" | logger
/sbin/ip route show  | logger

# Logging vpn route table
echo "/sbin/ip route show table vpn ----------" | logger
/sbin/ip route show table vpn | logger

Thanks to logger, we can check what happened during execution of route-up.sh when OpenVPN connected to the server:

$ logread | tail -n 30


⚫ Updating NordVPN configuration

I made this shell script to easily update the configuration using recommended server by NordVPN :

#!/bin/sh
# chmod +x /etc/openvpn/update_conf.sh

OpenVpnConfFile='/etc/openvpn/nordvpn.ovpn'

# recuperation du serveur recommandé par NordVPN
RecommendedServer=$(curl --silent --interface tun0 'https://nordvpn.com/wp-admin/admin-ajax.php?action=servers_recommendations' | jq --raw-output '.[0].hostname' | awk -F. '{print $1}')
echo "Recommended server by NordVPN:"
echo $RecommendedServer
echo


# récupération de la configuration
echo "Trying to get server configuration https://downloads.nordcdn.com/configs/files/ovpn_udp/servers/$RecommendedServer.nordvpn.com.udp.ovpn ..."
DownloadingServerConfFile=$(curl --silent --interface tun0 --write-out "%{http_code}" -o $OpenVpnConfFile https://downloads.nordcdn.com/configs/files/ovpn_udp/servers/$RecommendedServer.nordvpn.com.udp.ovpn)
if [ $DownloadingServerConfFile -eq 200 ]
then
   echo "OK $DownloadingServerConfFile"
   echo
else
   echo "NOK $DownloadingServerConfFile"
   exit
fi


# modification de la configuration pour ajouter password + route no-exec + route-up
echo "Trying to modify $OpenVpnConfFile configuration file..."
echo "$OpenVpnConfFile before modification:"
echo "----------"
echo "[...]"
sed -n '/auth-user-pass/{p;n;p}' $OpenVpnConfFile
echo "[...]"
echo "----------"
echo "Trying to modify $OpenVpnConfFile configuration file..."
sed -i 's@auth-user-pass@auth-user-pass /etc/openvpn/nordvpn.auth\nauth-nocache\nroute-noexec\nroute-up /etc/openvpn/route-up.sh@g' $OpenVpnConfFile
echo "$OpenVpnConfFile after modification:"
echo "----------"
echo "[...]"
sed -n '/auth-user-pass/{p;n;p;n;p;n;p;n;p}' $OpenVpnConfFile
echo "[...]"
echo "----------"
echo


# redemarrage de openvpn
echo "Trying to restart OpenVPN..."
/etc/init.d/openvpn restart
sleep 1
echo -n "Waiting for tun0 interface..."
while [ $(ifconfig | grep -c tun0) == 0 ]
do
   echo -n "."
   sleep 1
done
echo
t=$(ping -c 10 -I tun0  8.8.8.8 | grep -o -E '[0-9]+ packets r' | grep -o -E '[0-9]+')
if [ $t != 0 ]; then
   echo "OK. Done."
   echo -n "Public IP: "
   curl --interface wlan0 ifconfig.co/
   echo -n "VPN IP:    "
   curl --interface tun0 ifconfig.co/
else
   echo "Something went wrong."
fi
echo
echo "Last log:"
echo "----------"
logread | tail -n 30
echo "----------"

Check connectivity and switch on/off a LED (GL-AR150)

Written by pmd - - no comments

Shell script that will check if there is connectivity to a defined website every 60 seconds and switch ON/OFF the led :

  • /usr/bin/WANLED :
#!/bin/sh
while [ true ]; do
        /usr/bin/wget -q --tries=2 --spider https://www.google.com
        if [ $? -eq 0 ]; then
                #echo "Connected ! LED RED OFF. LED GREEN ON."
                echo "none" >  /sys/class/leds/orange:wlan/trigger
                echo "default-on" >  /sys/class/leds/green:configurable/trigger
        else
                #echo "Not connected ! LED RED ON. LED GREEN OFF."
                echo "default-on" >  /sys/class/leds/orange:wlan/trigger
                echo "none" >  /sys/class/leds/green:configurable/trigger
        fi
        sleep 60
done

Check which LEDs are available and modify in above script if necessary:

root@OpenWrt:~# ls /sys/class/leds
ath9k-phy0          green:configurable  green:power         orange:wlan

If --tries option is not recognized, you may need to install proper wget. Check like this:

root@OpenWrt:~# ls -la $(which wget)
lrwxrwxrwx    1 root     root            18 Apr 27 20:28 /usr/bin/wget -> /bin/uclient-fetch # Need to get proper wget
root@OpenWrt:~# opkg install wget-ssl
Downloading [...]
[...]
Signature check passed.
root@OpenWrt:~# ls -la $(which wget)
lrwxrwxrwx    1 root     root            21 May 21 06:16 /usr/bin/wget -> /usr/libexec/wget-ssl # No need to get proper wget

Schell script to autostart the above script :

  • /etc/init.d/WANLED :
#!/bin/sh /etc/rc.common

START=99
STOP=1

start(){
        /usr/bin/WANLED &
}

stop(){
        killall -9 WANLED
}

Now let's make these script executable and started at startup:

# chmod +x /usr/bin/WANLED
# chmod +x /etc/init.d/WANLED
# /etc/init.d/WANLED enable
# /etc/init.d/WANLED start

Now the orange LED should be ON when there is no connectivity to Google.

LEDs may be driven by other component. To be sure it is not, go to System > LED Configuration.
In my case it looks like this:

 Name               | LED Name           | Trigger |
--------------------|--------------------|---------|--------------
 green:power        | green:power        | none    | ☰EditDelete
 green:configurable | green:configurable | none    | ☰EditDelete
 orange:wlan        | orange:wlan        | none    | ☰EditDelete

FYI OpenWRT in use was : OpenWrt 22.03.5, r20134-5f15225c1e

Source: LED, Start script at startup, LED on when Internet is available

Extra applications on LEDE (GL-AR150)

Written by pmd - - no comments

Transmission

  1. opkg update
  2. opkg install transmission-daemon-openssl transmission-web luci-app-transmission
  3. opkg install nano
  4. nano /etc/config/transmission
  5. chmod -R 777 /tmp/USB_KEY

It is necessary to make a swap file on AR150 otherwise you cannot access the web interface...

  1. cd /path/where/we/will/make/swap-file
  2. Create a 64MB swap-file:
    dd if=/dev/zero of=swap-file bs=1M count=64
  3. mkswap swap-file
  4. swapon swap-file
  5. Then go to LuCI to specify the swap file in System > Mount points to have it mounted at next router reboot.

For worldwide access add a rule in LEDE firewall:
Any tcp, udp
From any host in wan
To any router IP at port 9091 on this device

Source

Bandwidth Monitor (nlbw)

opkg install luci-app-nlbwmon

Aussi :

https://github.com/Kiougar/luci-wrtbwmon

LEDE/OpenWRT on GL-AR150

Written by pmd - - no comments

How to upgrade GL-AR150 to Stock OpenWRT

  1. Connect to router using SSH
  2. # cd /tmp
  3. Check what is the last available release for GL-AR150 here.
  4. # wget http://downloads.lede-project.org/releases/17.01.4/targets/ar71xx/generic/lede-17.01.4-ar71xx-generic-gl-ar150-squashfs-sysupgrade.bin
  5. # sysupgrade lede-17.01.4-ar71xx-generic-gl-ar150-squashfs-sysupgrade.bin

Source

I installed this version: LEDE Reboot (17.01.4, r3560-79f57e422d).

How to upgrade all packets

opkg list-upgradable | cut -f 1 -d ' ' | xargs opkg upgrade

Sources 1, 2

Enabling remote SSH access on LEDE/OpenWRT

Configure Dropbear

  1. Go to the System / Administration page.
  2. Under “SSH Access”, for the default “Dropbear instance”, set “Interface” to “unspecified”.

This will cause dropbear to accept connections on all interfaces.

Open port 22 (or other)

  1. Go to the Network / Firewall / Traffic Rules.
  2. Scroll down to the “Open ports on router” section.
  3. Enter a name for this rule, e.g. “Allow-SSH-WAN”.
  4. Set “Protocol” to “TCP”.
  5. Enter “22” as the “External Port”.
  6. Click “Add”.
  7. Click “Save and Apply”.

Source

Using USB storage devices and FAT32&NTFS filesystems

  1. Connect to router using SSH
  2. # opkg update
  3. # opkg install kmod-usb-storage
  4. # opkg install usbutils
  5. # lsusb -t
    /: Bus 01.Port 1: Dev 1, Class=root_hub, Driver=ehci-platform/1p, 480M
       |__ Port 1: Dev 2, If 0, Class=Mass Storage, Driver=usb-storage, 480M
  6. To add support of FAT32 and NTFS (not tested yet) usb flash/disk drives:
    # opkg install kmod-fs-vfat ntfs-3g
  7. Then go to the LuCI administration page, System > Mount points, and configure :

Sources 1, 2, 3, 4, 5

Using the Huawei E3372 Hi-Link LTE Dongle with OpenWRT

Huawei E3372 and AR-150 have 192.168.8.1/24 IPv4 networks, change the LAN IP of AR-150.

  1. # opkg update && opkg install kmod-usb-net-rndis usb-modeswitch
    Of course, an internet connection is needed through Ethernet or Wifi for this step. :(
  2. Then go to the LuCI administration page, Network > Interfaces > Add new interface...:
  3. In my case interface "eth2" is now available to configure:
  4. In tab Firewall Settings, add this new interface in the wan firewall-zone:
  5. Click on Connect of the new network 4G_LTE:
  6. Done, you even have access to the USB dongle administration page 192.168.8.1.

Source Nouvelle source (2020-02)

DDNS

  1. # opkg install luci-app-ddns
  2. Go to LuCI administration interface > Services > Dynamic DNS.
  3. I used a Free DNS provider named freedns.afraid.org.

Source

Samba network share

  1. # opkg install luci-app-samba
  2. Go to LuCI administration interface > Services > Network Shares.
  3. Add shared directories:
    • Name: samba
    • Path: /Path/to/mounted/usb/key
    • Allowed user: empty
    • Create mask: 777
    • Directory mask: 777

Source

SFTP server

  1. # opkg update && opkg install openssh-sftp-server
  2. Use Filezilla or other to connect to sftp server.

Source

Rss feed of the category